The Myth — Standard Eye Makeup Rules Work on Any Eye Shape
If you have monolid or hooded eyes and you’ve spent years watching tutorials that just don’t translate — eyes that look great in the mirror but disappear the moment you open them — you’re not doing it wrong. The techniques were built for a different eye shape entirely. The myth isn’t that eye makeup doesn’t work on monolids. The myth is that the standard rulebook applies at all.
This is a frustration that runs deep. Not the occasional bad makeup day, but years of following instructions carefully, buying the right brushes, practising the blending, and still ending up with a result that looks nothing like the tutorial. If that sounds familiar, there’s a specific reason for it — and it’s got nothing to do with your skill level.
What the standard rulebook actually assumes about eye anatomy
The conventional rules of eye makeup — blend the crease, define the socket line, line close to the lash root — were built around a double-eyelid structure. That structure has a visible crease when the eye is open, a clear socket line that sits above the lid, and a strip of lid space that remains exposed regardless of what expression you’re making. The entire architecture of classic eye makeup technique assumes that crease is there, and that it stays visible.
Most mainstream tutorials, beauty school curricula, and even the diagrams on the back of eyeshadow palettes were designed with this anatomy as the default. That’s not a conspiracy — it’s just where the industry developed its foundations, primarily in Western markets. The problem is that when those techniques travelled, the assumption of a double-eyelid eye shape travelled with them, unmarked and unexamined.
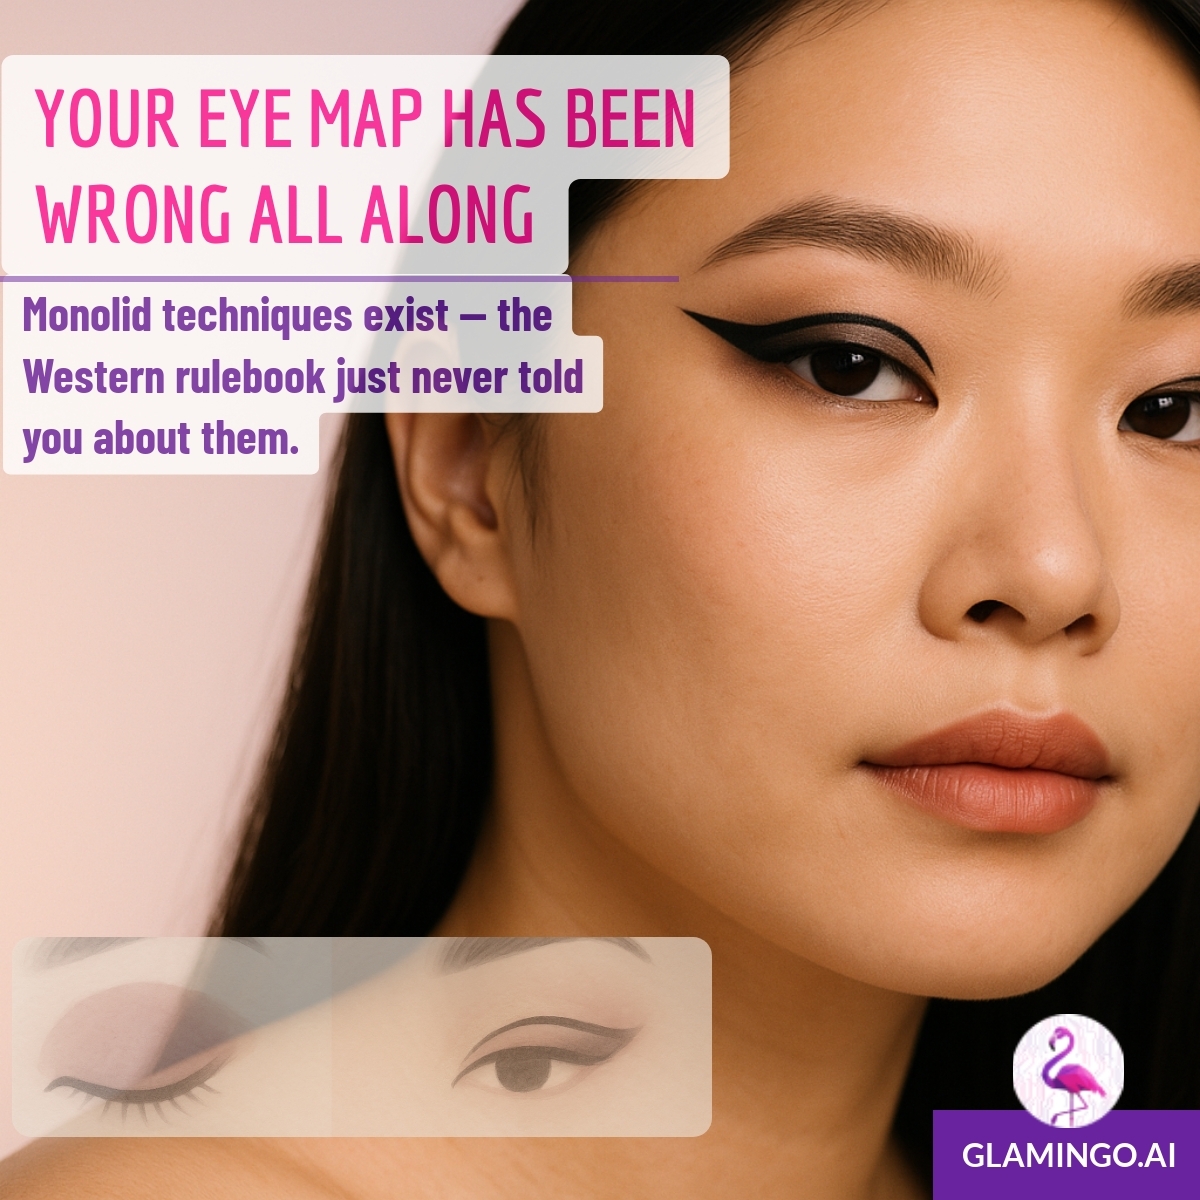
Why crease-based blending becomes invisible on monolid and hooded eyes when open
On a monolid or hooded eye, there is no visible crease anchoring the transition between lid and brow bone when the eye is open. The upper eyelid — the area where you’ve carefully blended three shades of shadow — folds under or sits flush with the brow bone. What was visible in the mirror with your eyes angled down simply disappears when you look forward. The work you did is still there. It’s just been rolled under the fold.
Think of it like painting a mural on a surface that will be partially rolled over once the viewer stands in front of it. If you paint in the zone that gets hidden, the viewer never sees it. The entire logic of where you place colour, line, and definition has to shift to the visible zone — which on a monolid or hooded eye is a different geography than on a double eyelid. The technique isn’t wrong; the map is.
The Verdict — Monolids and Hooded Eyes Require a Different Spatial Logic, Not Just Modified Techniques
This isn’t about tweaking. It’s not “do everything you normally do, just a little higher.” The shift required is more fundamental than that — it’s about understanding which real estate on your eye is actually visible to another person when you’re looking at them, and working exclusively in that zone.
The visibility problem: what gets covered when the eye is open
The visible zone on a monolid or hooded eye — the part another person can actually see when you’re facing them — is typically a narrow horizontal strip along the upper lash line, plus the inner and outer corners. The lid itself, which is the primary canvas for most blended looks, is largely or entirely covered by the fold. This means that the majority of shadow work done in the centre of the lid either disappears or compresses into an indistinct wash of colour. Definition requires working above that fold, or at the edges, or with tools — like lashes — that sit in the visible zone by default.
Vertical versus horizontal enlargement — choosing your outcome before choosing your technique
One thing that standard tutorials rarely address for monolid eyes is that there are two genuinely different things you might want from eye makeup, and they require opposite approaches. Vertical enlargement — making the eye look taller — calls for lifted lashes, light shimmer placed on the centre lid, and liner flicked upward. Horizontal elongation — making the eye look wider or more almond-shaped — calls for extending colour outward at the corners, using a stretched liner wing, or deepening the outer third. These are distinct outcomes with distinct techniques, and choosing one before you start changes every subsequent decision. Most tutorials skip this step entirely, leaving you following instructions optimised for a result you didn’t actually want.
Five Specific Myths Crushed
Myth 1 — Draw liner as close to the lash line as possible
This is the rule that causes the most silent frustration. On a double-eyelid eye, lining close to the lash root makes sense — the liner stays visible and defines the lash line cleanly. On a hooded monolid, that same liner sits precisely in the zone that gets covered by the fold when the eye opens. You’ve lined perfectly, by the rules — and then you open your eyes and it’s gone, or reduced to a faint shadow. Online communities have documented a counter-technique — drawing liner with your eyes open, looking straight ahead — that diverges from conventional beauty school method entirely. It feels counterintuitive at first. It works because you’re placing the line in the visible zone in real time, not guessing where that zone will be after you open your eyes.
Myth 2 — Black eyeliner gives the most definition
Black liner is high contrast, which is exactly the problem on a monolid eye that folds. When the lid closes over a thick black line, the compression can make the visible eye appear smaller and heavier, not more defined. Dark brown liner, by contrast, creates definition with softer contrast — enough to see, without the visual weight that black adds when the fold sits over it. This is technique preference drawn from real experience rather than clinical evidence, but it’s consistent enough across different skin tones and lid types to be worth testing before you default to black out of habit.
Myth 3 — Crease shadow blending creates depth on monolids
The crease blend is the cornerstone of almost every eye tutorial you’ve ever watched. Transition shade into the socket, darker shade at the crease, blend upward for dimension. On a monolid eye, there is no visible socket to anchor this gradient when the eye is open. The shadow sits on a flat surface — or disappears under the fold entirely. Depth has to be built differently: through contrast at the outer corner, through lash volume that creates shadow at the lash line, or through strategic shimmer placement that reflects light in the centre of the visible lid strip.
Myth 4 — Eyeshadow looks the same before and after you open your eyes
It does not. On a double-eyelid eye, the difference between eyes-closed and eyes-open shadow appearance is relatively small. On a monolid or hooded eye, the transformation can be dramatic — a carefully blended lid turning into a narrow stripe, a gradient vanishing, a shimmer look becoming a thin gleam of light. If you’re only checking your shadow with your eyes partly closed or angled down toward a mirror, you are not seeing what anyone else sees. The correction is simple but important: check everything with your eyes fully open, looking straight ahead. What survives that check is what your makeup actually looks like.
Myth 5 — Lashes and mascara are secondary to shadow technique
On most double-eyelid tutorials, lashes are the finishing touch — shadow and liner do the heavy lifting, lashes complete the look. On monolid and hooded eyes, this hierarchy inverts. Because the lash line sits in the always-visible zone, lash lift and volume change the perceived shape of the eye more dramatically than shadow placement. Lashes that curl upward increase the visible lid strip. Volume along the outer lashes pulls the eye shape outward. On a monolid eye, a good lash curler and a lifting mascara — or lash extensions, if that’s your preference — can do more visible work than twenty minutes of careful shadow blending. Lead with lashes. Let shadow support.
What Actually Works — Techniques Built for This Eye Shape
Eyes-open application: blending with your eyes open rather than closed
This is the single most transferable technique shift. Rather than closing your eye and blending shadow or liner onto a flat lid, keep your eye open and apply while looking into the mirror. This forces you to place product in the visible zone — because you can see in real time exactly what’s showing and what’s disappearing under the fold. It feels strange at first, especially if you’ve spent years doing the opposite. The learning curve is about two sessions. After that, it becomes automatic.
Liner placement above the fold, not at the lash root
Rather than lining at the lash root and hoping it stays visible, draw your line higher — starting in the inner third at the lash line but gradually lifting toward the outer corner to sit above the fold’s natural edge. The specific height depends on your individual lid thickness, which is why the eyes-open application approach matters: you can see where the fold falls on your specific eye and place the liner just above it. The line won’t look “perfect” in the classic sense when your eye is closed. That’s fine. You’re not asleep when people look at you.
Lashes as the primary shaping tool, shadow as secondary
Curl first, always. A lash curler on a monolid eye opens up the lid exposure significantly — even a few millimetres of additional visible lid strip changes the entire proportion of the eye. Build from there with mascara that lifts rather than just lengthens. Shadow then plays a supporting role: a wash of shimmer in the centre of the newly exposed lid, a darker shade at the outer corner to elongate, nothing elaborate in the inner crease where it will be lost. Let the lashes do the defining. Let the shadow add dimension to what the lashes have already opened up.
The K-beauty gradient pupil look — why it works anatomically
K-beauty developed the gradient pupil technique — placing a lighter or shimmery shade directly over the pupil with slightly deeper tones toward the corners — as an approach built for monolid and low-crease anatomy, not as an adaptation of Western technique. It works because it creates the illusion of dimension in the centre of the visible lid strip, where monolid eyes actually have exposed surface. The outer corner darkness draws the eye shape outward. The central light reflects forward. The result reads as defined and bright even on a flat lid with no crease. This is not a Western technique with a K-beauty name. It is a genuinely different approach, built from different anatomical starting assumptions.
The Honest Caveat — Monolids Are Not One Shape
Flat monolid versus thick or puffy monolid — the techniques differ
Here is where even monolid-specific tutorials often fall short. A flat monolid — a lid with minimal excess skin or fat — has a different visible zone and different technique requirements than a thick or puffy monolid, where the lid tissue itself creates additional coverage over the lash line and inner corner. On a flat monolid, a careful liner placed just above the fold stays reasonably visible. On a thick or puffy monolid, even that adjusted placement can disappear under the additional lid volume. The techniques are not interchangeable, and pretending there’s one “monolid technique” is its own version of the same mistake.
Why tutorials that work for one monolid type fail on another
The documented tutorial gap is this: available content tends to cover either monolid without puffiness, or Western-style hooded eyes — leaving the specific combination of monolid plus lid thickness chronically unaddressed. This combination is genuinely common among East and Southeast Asian women, and the techniques that work for it are distinct from both adjacent categories. If you have a thick or puffy monolid and you’ve been following flat-monolid tutorials, the mismatch is as fundamental as following a double-eyelid tutorial in the first place. The starting point for finding what works is accurate identification of your actual lid type — not just “monolid” as a single category.
The Single Action — What to Change This Week
This week, apply your eyeliner with your eyes open instead of closed — draw the line while looking straight into the mirror — then check whether what you placed is actually visible once your lid settles. If it disappears under the fold, move the placement up by 1–2mm at a time until the line stays visible. That single adjustment to placement logic is where most of the technique mismatch lives.
If this has you thinking it’s time to get professional lash work done — extensions, a lift, or a tint — rather than trying to compensate with mascara alone, Glamingo has verified lash treatment providers near you with real reviews from women who know exactly what they’re working with. Find a lash specialist near you →
Leave a Reply